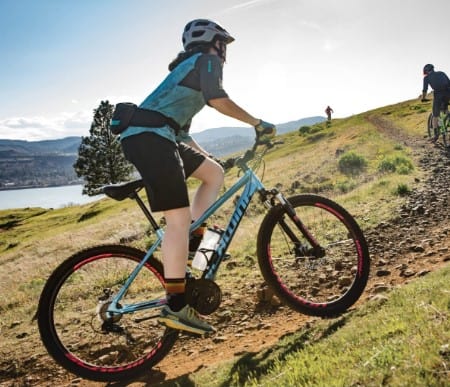
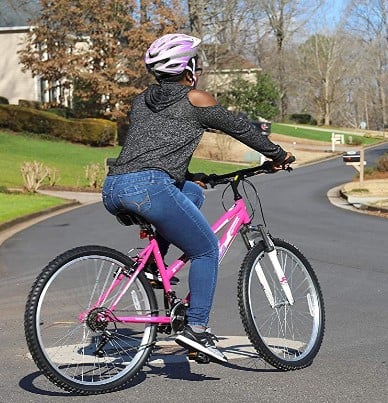
So, you’ve bought the geared bike you’ve always wanted. You are, however, concerned since you don’t know how to use the gears. Lucky for you, I’m going to share the steps on how to shift gears on a bike for dummies.
Below is a summary for shifting bicycle gears.
How To Shift Gears On A Bike For Dummies
1. Identify your bike gears
2. Use the left-hand shifters to control the front gears
3. Use the right-hand shifters to control the rear gears
4. Down-shift (or gear-down) to ease the pedaling and make it less powerful;
5. Up-shift (or gear-up) to harden the pedaling and make it more powerful
6. Only shift when you’ve to pedal forward
7. Always start and end with a low gear
8. Gear down to climb hills and gear-up to descend or accelerate on flat ground
I’ll describe all these steps to demystify the process of gear shifting. By the end of the article, you should have everything about bike gears explained.
But before we can get into the steps, let’s understand the gear language and how shifters work.
How To Shift Gears On A Bike For Dummies – The Gear Language
To start, here are the most standard gearing terms you should know about:
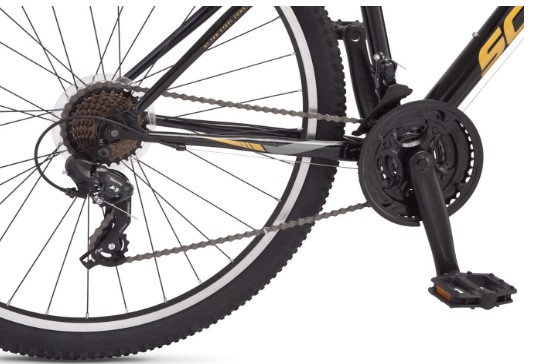
Sprocket – This is the individual gear you find within a cassette.
Shifters – They control the derailleur.
Chainring – This is the toothed ring you find on the drivetrain’s front part. It’s usually attached to the cycle’s crank.
Derailleur – This feature moves the chain between the sprockets or chainrings.
Cassette – This is a group of sprockets on the drivetrains rear part. It contains as many as 11 gears.
Drivetrain – This is the assembly of every moving part that connects the rear wheel and the crank. That includes the chain, chainring, and cassette.
Cadence – This is a term for the pedaling speed, expressed as revolutions per minute (or RPM).
Understanding Bike Gears
Generally, a geared bicycle comes with front chainrings (front gears) that can be anything between one and three in number.
These chainrings (front gears) are attached to the pedal crank arm. On the cassette are about 7-12 cogs (what we call rear gears), and they are attached to the bike’s rear wheel.
When the bike chain shifts from the smallest cog/gear to the largest, then your pedaling effort eases.
And when you shift in-between the chainring and the bike’s front side, the pedaling becomes easier on the small chainring but harder on the big one.
How Bike Shifters Work
Generally, bike gear shifters depend on the cable’s tension. The cable runs between the levers and derailleur.
When you twist the bikes twist levers, you’ll hear a click sound that indicates that you’ve picked a gear. We call it indexing, which means that you haven’t over-shift or under-shift.
Usually, the derailleur moves the chain to different gears. The derailleur features large springs that apply tension to the cable. And when you twist the twist levers, the cable tightens or relaxes the spring tension, moving the chain either up or down the gear.
How To Shift Gears On A Bike For Dummies in 3 Steps
Here are the steps to follow:
Step 1 – Identify Your Bike’s Gears
You should know if your bike has a single gear (single-speed) or multiple gears. If they are numerous, you should identify the number.
Here is how to go about it:
- Count the front gears
Just look at the pedals, especially the center part. You should be able to see one or several toothed metal rings that fit onto the chain.
The metal rings are what we call the front gears. So, count them. In most bikes, they are about 1-3.
- Count the rear gears
Look at the rear wheel to identify the chain running from the front gears to the wheel’s middle (back wheel). Then count the sets of rings that the chain runs over.
They are what we call the rear gears. Typically, there are more rear bike gears than front gears. Some bikes have as many as 12 rear gears.
- Multiply the front gears by the rear gears
If the front gears are three and the rear gears are nine, the total gear number will be 27. That gives you a 27-speed bike.
And if the front gears are three and the rear gears are six, they give you an 18-speed bike.
But if you only have one rear gear and one front gear, your bike is a single-speed bike. Sadly, you cannot shift a single-speed gear.
Step 2 – Learn The Shifting Basics (How To Use Bike Gears For Dummies)
Here are the basics for shifting bike gears:
a. Left-hand shifters = front gears
Generally, the left-hand shifters control the front gears. Once you press the left shifters, the derailleur moves the chain sideways to enable it to catch a front gear.
In turn, the front gears assume a massive shift in the bike gear ratio.
b. Right-hand shifters = rear gears
When it comes to controlling the rear gears, you’ve to engage the right-hand shifters. The rear gears have an independent derailleur.
Once you engage the right shifters, the rear derailleur moves sideways to enable the chain to catch a back gear. In turn, the rear gears assume a small shift (adjustment) in the gear ratio.
The mechanism is almost similar to that of front bicycle gears for dummies.
c. Downshifting (Gearing down)
In some situations, gearing-down (switching to a low gear), also known as downshifting, is the way to go. That includes when anticipating a climb.
Downshifting generally makes pedaling more straightforward and, more importantly, less powerful. You won’t go far, but you’ll go quicker.
In general, you can gear-down in two ways:
- Shifting into the smaller front gear
- Shifting into the bigger rear gear
d. Upshifting (Gearing up)
If you want to go further, you’ll have to pedal harder, which means switching to high bicycle gear. We call it upshifting or gearing-up, and you can do it in two ways:
- Shifting into the bigger front gear
- Shifting into the smaller rear gear
And More
e. Practice to gear-up and gear-down on a flat surface
Now that you know when and how to gear up and down-shift, you have to perfect the skill. Coincidentally, there’s no better place for that than the flat ground.
You can go to the park, the local streets or the parking space and practice there.
You’ll hear the chain makes some rattle or clicking sound depending on whether the pedaling is hardening or easing.
f. Only shift when pedaling forward
The last tip to remember is that you should only shift when pedaling forward. If you do it when pedaling backward, the chain won’t tighten up to catch any gear.
And if that happens, it’ll slip off when you decide to pedal again.
Step 3 – Know When To Shift Gears On A Bike
After knowing the basics of shifting, it’s time you know when to shift and how to do it.
Here’s what you should know:
a. Start and end with a low gear
You need easy gear (what we call low gear) to start cycling. So, whenever you start riding your bicycle, shift down. That will make the pedaling much more manageable.
You’ll also need to downshift when coming to a stop. That makes it easy to start the next time you want to cycle. That is more important in tricky terrains like a hilly drivetrain.

b. Gear-up gradually to build speed
After downshifting to start cycling, you have to upshift to build some momentum and speed. You’ll notice the low gear feeling easy once you start your cycling, which doesn’t help with speed.
You’ll need to gear up to go faster. Besides, gears are there to make you more quickly, and so you’ve to use them.
Switch to a higher gear to feel the pedals hardening, and that will accelerate you.
You wouldn’t have to ask ‘how do bike gears work’ once you reach this step.
c. Downshift to conquer climbs
When it comes to climbing hills, you need the easy gear (low gear).
You don’t expect to accelerate there. So a higher gear won’t help.
You have to ascend steadily and slowly, and nothing does that better than a low gear. So, downshift when you anticipate riding uphill.
It’ll also mean more balance to conquer the hills.
And More
d. Shift-up on descents and flat grounds
Speed is of the essence when descending or riding on flat ground. So, when you expect a slope or flatter ground, consider shifting up.
Put merely, switch to a higher gear. That’ll keep you accelerating at a steadier rate until you attain a top speed.
But given that you’ll be going very fast, you have to watch out not to hurt yourself or hit someone.
e. Gear up carefully not to hurt the joints
Lastly, exercise some care when shifting up not to hurt your joints. Remember, high gear can stress your joints, more so the knees, and you don’t want that.
Therefore, avoid joint pain and soreness by learning to gear up more carefully.

How To Shift Gears On A Bike For Dummies FAQs
1. What Is A Low Gear On A Bike?
The low gear is simply the smallest chainring on the front and the biggest cog on the cassette. It’s also known as the easy gear, and it’s generally best for climbing.
A low gear suffers minimal resistance, and as a result, it makes hill cycling with a bike with gear much comfortable.
2. How Do Bicycle Gears Work?
Typically, you control the bike rear gears with the right-hand shifters and the front gears with the left-hand shifters.
Whenever you want to ride uphill, start or come to a stop, you should gear down (switch to a low gear).
In that case, you’ll need to shift into the smaller front gear or, the bigger rear gear. That’ll allow you to ease the pedals and shift down.
And when you want to accelerate, you should gear up to harden the pedals. In that case, you’ll need to shift into the bigger front gear or smaller rear gear to shift up.
3. What Bike Gear To Use On A Flat Road?
Now that high gear is best for descending and a low gear for ascending, a middle gear is best for the flat road. It’s best for cruising on gentler terrains as it enables you to build enough resistance to pedal smoothly.
4. What Gear To Use When Going Uphill?
The best gear for going uphill is low gear (the easy gear). It’s usually the smallest chainring on the front and the biggest cog on the cassette.
Such a gear makes pedaling much more comfortable, and so you get to ride uphill with minimal resistance.
5. How Do You Change Gears On A Bike For Dummies?
Here are the necessary steps on how to use gears on a bike:
- Shift the front gear with the left shifters
- Shift the rear gears with the right shifters
- Switch to a low gear (easy gear) when riding uphill
- Switch to high gear (harder gear) when descending or accelerating
6. Why Is It Hard To Shift Bike Gears?
Your gears could be hard to shift because of a poorly adjusted cable tension. In that case, you need to readjust the cable tension. If you cannot do it, take the bike to a mechanic.
It could also be a misaligned rear derailleur. In that case, here’s how to adjust the front derailleur of a mountain bike.
Other reasons include a dirty or poorly lubricated drivetrain or chain or worn-out gears.
7. What RPM Should You Shift Gears On A Bike?
Ideally, the best cadence, expressed as RPM (revolutions per minute), is about 3,000-5,000 RPM.
You should note, however, that the cadence remains unproductive as the bike gets older.
8. What Gear Should I Bike It On Flat Road?
It’s best if you have more speed when riding on flat ground. That only means that you need to shift up, and you need high gear.
Switching to a higher gear allows you to cycle at a much faster pace, even though the pedaling is harder.
9. What Is The Easiest Gear On A Bike?
The easiest gear is the lowest gear. That’s the smallest chainring on the front and the biggest cog on the cassette.
The other gears, in this case, are between the two extremes. Essentially, the easiest gear (low gear) is best for climbing.
10. How Do You Know When To Shift Bike Gears?
If you start cycling or come to a stop, you need to switch to a low gear. It will be best also if you down-gear (or downshift) when anticipating a hill.
In contrast, you should gear up (move to a high gear) when descending or accelerating.
Relevant
Closing Thoughts
Above is everything to know about how to shift gears on a bike for dummies. So, even if you didn’t know anything about changing a bike’s gears, you can now do it smoothly and confidently.
Whether it’s an MTB or road cycle, the above guide is resourceful. So, use it.
Frequently Asked Questions
How do you use gears on a bike for beginners?
Learning how to use the gears on a bike can be an exhilarating experience. Remember, there’s no rush to master it; take your time and progress at your own pace. The most important thing to know when using gears is to **adjust your gear according to the terrain you’re tackling**. If you’re climbing a hill, it’s easier to pedal in a lower gear. Conversely, for flat terrains or downhill slopes, you can comfortably switch to a higher gear.
When changing gears, ensure you're pedaling at a steady consistent cadence, this helps prevent the chain from slipping. Always try to foresee the need for shifting gears; for instance, shift to a lower gear before you begin to climb a hill, not in the middle of it when your bike is already under heavy strain.
When I first started biking years ago, I remember being on a trail ride and not understanding why I was finding it so hard to pedal, until a fellow rider suggested I shift down to a lower gear. It was a game changer, and it's something I always share with people just starting on their biking journey.
If you're unsure, I highly recommend referring to resources like Sheldon Brown's amazingly comprehensive Bicycle Gear Guide for deeper insights.
How to use 3 speed gears on a bike?
Three-speed bikes, often seen in city bikes or commuter bikes, are straightforward but can vastly enhance your biking experience with their simplicity and efficiency. The three-speed system generally includes a low gear for uphill or headwind, a medium gear for everyday riding, and a high gear for downhill or tailwind.
When using three-speed gears, it is essential to remember to shift only when you're still pedaling but with less effort on the pedals, to reduce strain on the bike's gears. Start your ride in the first gear, it's the easiest to pedal and is great to get moving from a stop. Once you pick up steam, you can shift up to the second gear, which is perfect for regular flat roads. If you catch a tailwind or start going downhill, shift up to the third gear, which will provide more resistance but will make you go faster.
Years ago, when I shifted to a city with more hilly terrains, I was initially hesitant about the three-gear bike system. But once I got the hang of it, it was immensely liberating not to constantly worry about changing between many gears, my journeys became smoother and I enjoyed my rides more.
This REI's blog on how to shift bike gears can be pretty handy if you're starting out with a three-speed bike.
What is the proper way of shifting gears in a bike?
The right way to shift gears on a bike requires a combination of instinctive understanding and deliberate practice. The key is to **release the throttle, pull in the clutch lever, use the shift lever to change gears, release the clutch lever, and reengage the throttle**. It might seem complex initially, but trust me, with enough practice, this swiftly becomes a second nature.
Don't worry if you stall the bike a few times when you're learning – that's how most of us have learned! My first motorcycle was a gift from my father, and oh boy, the number of times I stalled that thing! But each failed attempt taught me something new, and eventually, I got the hang of it.
And remember, it isn't just about simply shifting the gears. It's also about knowing when to shift. Being sensitive and attuned to the feedback you are getting from your bike is crucial. If your engine is struggling, shift down; if it's revving too high and the ride feels jerky, shift up. A motorcycle isn't just a machine. Over time, it becomes an extension of you.
For a more comprehensive understanding, you might find this motorcycle shifting tutorial video on YouTube extremely useful.