We cyclists want our bikes at their best, and that means no funny sounds. So understandably, you worry when the derailleur rubs against the spokes. But you’ve to ask, why is my derailleur hitting my spokes?
Often, the derailleur hits the spokes when its hanger is bent following a heavy hit. If that’s not the case, it could be due to wobbly spokes, misadjusted limit screws, or incorrect cable tension.
We’ll talk about all these possibilities and what you can do to fix them. Hopefully, the tips that I’ll share will stop the issue and prevent it.
After all, you need both the derailleur and the spokes for your bike to work at its best.

Why Is My Derailleur Hitting My Spokes?
Here are some possible reasons why your derailleur is rubbing against the spokes:
1. The Derailleur Hanger Might Be Bent
The derailleur hanger is principal as it prevents damage to the drivetrain.
Usually, it sacrifices itself during a heavy impact that targets the drivetrain. For that reason, you have to replace the hanger immediately after a hit.
One of the risks of failing to replace the derailleur after a crash is that the bent derailleur can rub against the spokes.
If that happens, then you’ll not just worry about the spokes but also a damaged derailleur.
But, how do you check for a bent hanger?
Well, if the hanger is not straight, its cage won’t align with the bike chain. But for as long as the bent is only a few degrees off, it’s possible to straighten it.
However, if the bent is extreme, consider replacing the derailleur hanger.
How to stop rear derailleur hitting spokes if the hanger is bent
If the derailleur hanger is bent, the solution is to straighten it.
Here’s how to fix a bent derailleur hanger:
- Remove the hanger
Once you confirm that the derailleur hanger is bent, remove it. But first, shift gently into the smallest sprocket and then undo (loosen) the mounting bolts.
After that, remove the hanger from the bike.
- Straighten the hanger
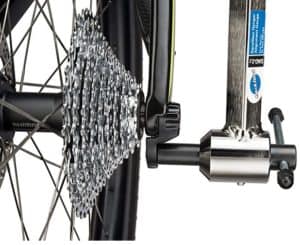
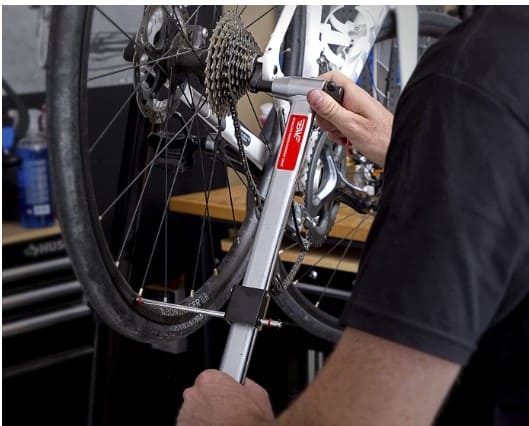
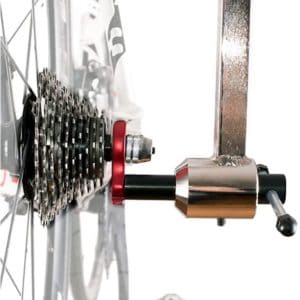
You’ll need a hanger alignment tool (View on Amazon) in this process. You should thread the alignment tool into the derailleur hanger clockwise.
Then adjust the hanger’s arms against the bike’s wheel in its 6 o’clock position.
Afterward, rotate the bike wheel before turning the alignment tool to the 12 o’clock position.

Alternatively, you can straighten the hanger with an adjustable spanner if you don’t have an alignment tool.
You’ll need to tighten your spanner over the derailleur hanger and then twist it gently to realign the bent hanger.
- Reinstall the hanger
Lastly, refit the derailleur hanger as it was previously. Then try to shift.
If the derailleur no longer hits the spokes, it means you just fixed the issue. But if the rubbing continues, then consider other possibilities (discussed below).
2. The Spokes Could Be Loose
If the spokes are loose, there’s always the risk that they may move towards the derailleur and rub against them.
This issue usually is easy to diagnose since you only need to pluck them, one by one, and identify the loose ones.
Loose spokes usually produce a buzzing sound when plucked.
Once you identify the loose spokes, adjust them using a spoke wrench.
Here’s how to fix the spokes on a bike using a spoke wrench:
- Attach the spoke wrench to the spoke nipple
- Turn the wrench anticlockwise to tighten the spokes
- In case you over tighten the spokes, loosen them slightly by turning the spokes clockwise
If you don’t have a spoke wrench, you can use needle-nose pliers or an adjustable wrench.
3. Limit Screws Might Be Set Wrongly
If the limit screws are out of alignment, the chances are that derailleur will rub against the spokes.
In that case, you also have to check them and ensure they are well adjusted.
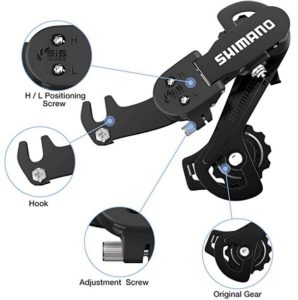
Mark you, the limit screws are the adjustment screws on the derailleur cage.
Note that the limit screws prevent the chain from dropping into the spokes or dropouts.
Overall, tightening the limit screws allows you to restrict the outward movement of the chain while loosening them enables the bike chain to move outwards.
Let’s look at the two limit screws and how you can adjust them.

a) Low-Limit Screw (L-Screw)
The Low-Limit screw, market L, prevents the derailleur from moving towards your spokes.
When well adjusted, the screw allows the chain to settle in the biggest cog when pedaling without the chain skipping or rubbing against the spokes.
To adjust the L-Screw, you need to:
- First, confirm that the screw is not seating too far out or shifting into your spokes.
- If that’s the case, shift into the smallest ring/cog and then push the derailleur (with your thumb) into the biggest cog. That allows the top pulley to align with the biggest cog.
- If the top pulley moves past the biggest cog and towards the spokes, turn the L-screw clockwise to tighten it firmly.
- If the L-screw is too tight, and you want to loosen it, consider shifting to the second biggest cog.
- Then push the derailleur (with your thumb) into the biggest cog and temporarily hold it as you pedal.
- Check to see if the chain is skipping. If it is, loosen the L-screw by turning it anticlockwise by about a quarter turn or until the skipping stops.
b) High-Limit Screw (H-Screw)
If you are still unsuccessful after adjusting the limit screws, you should check the high-limit screws and adjust accordingly.
Note that the H-screw allows your chain to smoothly move into the cassette’s smallest cog without slipping off and dropping into the frame dropouts.
If it’s not set well, then things could go wrong with the derailleur.
Here’s how to adjust the H-screw when the rear derailleur is hitting spokes:
- First, shift into the smallest ring on the cassette
- But if the derailleur doesn’t shift, loosen the cable tension
- Once the cable tension is loose, try to move again into the cassette’s smallest ring as you watch the derailleur’s top pulley position
- If the pulley is directly underneath the smallest ring, it’s too far, and so you should turn the high-limit clockwise
- If the pulley is far out, turn the high-limit screws clockwise
- Then try to pedal the bike
- If you can still hear the rubbing noise, try loosening the H-screw by about a quarter turn or until the rubbing seizes
4. The Derailleur Cable Tension Might Be Incorrect
If the derailleur cable tension is not well adjusted, the derailleur might rub against the spokes. We call it a cable stretch even though it has nothing to do with a stretched derailleur cable.
Usually, it’s a case of the derailleur cable trying to settle into its housing, and so you may need to tighten it a little to maintain the smooth shifting.
But how do you adjust the cable tension?
Well, you need to employ the barrel adjuster, which you find at the point where the derailleur cable exits its housing.
Remember, turning the adjuster clockwise reduces the table tension, while turning it anticlockwise adds the tension.

Bonus Point – Adjust Your Derailleur
We’ve talked about the derailleur cable and the limit screws, which you must check and adjust. Note, however, that there is more to a derailleur than the two components.
So, sometimes it helps to adjust the entire derailleur. In particular, check the front derailleur and adjust it accordingly.
So, how do you fix a misaligned derailleur?
You have to realign a misaligned derailleur to fix it.
Here’s a post I did on adjusting the front derailleur of a mountain bike that can help you in that aspect.
But if you are not sure how to go about it or do not have the tools, take your bike to the nearest bicycle repair shop.
Why Are My Bike Spokes Breaking?
Are you worried that some of your spokes are broken? The problem could be something different from the derailleur rubbing against the spokes.
It could be because of any of these reasons:
- An untrue wheel (broken or bent rim) – If this is the case, consider truing the wheel, which you can do with a suitable bike repair stand.
- The spokes are rusty – Rust weakens the spokes, making them vulnerable to breaking. If your spokes are rusty, consider replacing them.
- The spokes are just low quality – If the spokes are not stainless steel or are just low quality, they could easily give in to the pressure and break.
- You are riding aggressively – If you aggressively ride a bike not built for aggressive cycling, you could easily bend the wheel and break the spokes.
- You are overloading the wheel – If your body weight exceeds your bike’s holding capacity, you could overwhelm the wheels and the spokes.
In Conclusion, Why Is My Derailleur Hitting My Spokes?
Essentially, you should check for a bent derailleur, loose spokes, misaligned derailleur cable, or misadjusted limit screws. Any of these reasons could indicate what is ailing your derailleur or spokes or both.
Remember, once you know the cause, then it’s easy to come up with the solution. I hope the above guide will offer you both.
Frequently Asked Questions
What are the symptoms of a bent derailleur?
Identifying a bent derailleur may not be straightforward for everyone, especially if you are new to biking. However, there are some telltale signs you can look for. If your derailleur is bent, you will experience challenges when trying to shift your gears. This could manifest as noisy gear shifts, slow shifting, or even the inability to shift onto certain gears. In more severe cases, you could experience chain slippage or chain suck, which could result both in a shaky ride and a possible fall. The underlying cause of these symptoms is usually that the bent derailleur is not aligning the chain properly with the different sprockets/cogs.
How do you adjust the tension on a rear derailleur?
To adjust the tension on your rear derailleur, you will need to focus on the derailleur cable. Find the barrel adjuster, which is usually located on the derailleur itself or sometimes can be found at the shifter. Once located, try tightening the tension by turning the adjuster counter-clockwise, and then test your gear shifting. If you find that the tension is too tight and shifting becomes problematic, turn the adjuster clockwise to loosen the tension.
Why is my rear derailleur clicking in the highest gear?
A constant clicking noise from your rear derailleur, particularly in the highest gear, suggests something is out of alignment. The common culprit is often your shifter cables which have stretched enough to disrupt the derailleur’s positioning. This misalignment forces your chain to rub against the derailleur cage or sit between gears, producing a clicking sound. If you’re experiencing this, ensure that your derailleur is correctly aligned and check your hanger for any bends.
How do you adjust rear derailleur limit screws?
Adjusting the rear derailleur limit screws is typically a two-step process. These screws are usually labelled ‘H’ and ‘L’, standing for ‘High’ and ‘Low’. The ‘H’ screw adjusts the limit for the smallest cog, while the ‘L’ screw adjusts the limit for the largest. To fine-tune these settings, shift the derailleur to the smallest cog and adjust the ‘H’ screw until the jockey wheel aligns directly beneath this cog. Follow a similar process for the ‘L’ screw, but this time, shift to the largest cog. Remember, clockwise turns send the derailleur outwards towards the smaller cogs, while anti-clockwise turns bring the derailleur inwards towards the larger cogs.