People research how to learn to ride a bicycle without an instructor for different reasons. It’s a form of self-accomplishment for some, and for others, it’s cost-saving since they don’t have to pay someone.
Whatever your reason is, you can learn how to teach yourself to ride a bike by following these steps:
- Identify a good location for cycling
- Wear the right biking gear
- Check and readjust your bike
- Learn to get on and off the bike
- Start scooting
- Learn to balance
- Start riding on your own
- Keep practicing
Having learned to cycle on my own using the above steps, I’m confident that you can too. The experience and even the time of perfecting the skill may differ, but it’s achievable.
I’ll explain what to do precisely in each step to make it appear like you have an instructor when you don’t.
But first thing first, let’s find you an excellent beginner-friendly bike.

What’s the Best Beginner Bicycle?
Not all bikes suit beginners.
A beginner-friendly bike should be easy to ride, comfortable to sit on and steer, durable in build, and lightweight in the frame. Additionally, it should come with powerful brakes and a reliable drivetrain.
One such bike is the Schwinn Volare 1400 700c Road Bike (View on Amazon).
This road bike features an aluminum handlebar, frame, and seat post to give it a lightweight design.
Its oversize tires promote a smoother, faster ride, while its 14-speed shifter-integrated drivetrain encourages smooth gear shifting.
You could also try the Diamondback Bicycles Century 2, which is also lightweight and come with powerful disc brakes and a Shimano drivetrain.
How To Learn To Ride A Bicycle Without An Instructor in 8 Steps
Step 1 – Identify a Good Cycling Location
The location determines your safety and cycling comfort. For example, riding on a street with low traffic reduces the chances of hitting someone or something.
Likewise, riding on a well-tarmacked road allows you to ride smoothly and enjoyably.
In that case, try to avoid locations that are:
- Grassy
- Bumpy or steeper
- With high traffic
Instead, look for locations with lower traffic, smoother surfaces, and broader spaces for easy turning. Perfect choices include:
- Parking area
- Flat sideways
- Open spaces
Step 2 – Wear the Right Biking Gear
The right biking gear is essentials when learning how to ride a bicycle for the first time. If you get it wrong, not only will you have an uncomfortable cycling experience, but you’ll also compromise your safety.
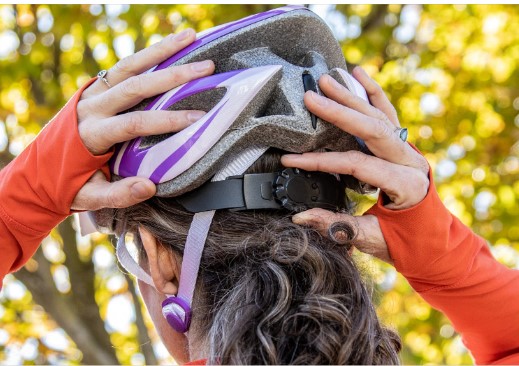
Generally, you’ve to wear a good helmet, for starters, to protect your head from injuries during a crash. Don’t go for just any helmet unless it’s certified to be safe.
Its fit should be correct to feel comfortable. Moreover, it should be lightweight, well-aerated, and aerodynamic.
One such helmet is the Schwinn Thrasher Bike Helmet.
The other consideration is your biking clothing. You’ve to protect your knees and elbows.
That means you can wear long pants and long-sleeve shirts. However, the pants shouldn’t be too loose to avoid getting caught by the tire or drivetrain.
If you don’t want to take chances, consider biking shorts like the BALEAF Biking Cycling Shorts. They are well-padded, breathable, and lightweight to feel comfortable.
Your hands need some protection too. Additionally, they should feel comfortable and warm.
You can guarantee that with the right biking gloves like the SIMARI Winter Gloves. They are warm, comfortable, elastic, and slip-resistance.
Step 3 – Check and Readjust Your Bike
You must check your bike and make the following adjustments when learning how to ride a bike:
- Adjust the seat height to suit your size. Remember to start with a lower seat height.
- Test the bike’s brakes to see how they feel. More importantly, observe how your bicycle reacts when you press the bikes.
- Reach for the handlebar to see if you can comfortably steer the bike and press the brakes. If you can’t, then adjust it to suit your use.
Step 4 – Learn to Get On and Off
Before you can even start cycling, you must be comfortable getting on and off the bike. While at it, apply the brakes to prevent the bicycle from wobbling.
Also, apply the brakes when getting off the bike. Overall, you should repeat this step as often as you can until it becomes seamless for you.
Step 5 – Start Scooting (How To Ride A Bicycle Without An Instructor)
Scooting is touching the ground with both feet while seated on the bike. It’s a crucial step to balancing and ultimately riding a bicycle.
Here’s what to do to learn to scoot:
- Sit on the bike and reach to the ground with both feet
- Look forward as you scoot (not on the ground)
Step 6 – Learn to Balance
Once you are comfortable scooting, it’s time you learn how to balance on the bicycle. You’ll need to start at a scooting position.
Remember to pick a location that won’t allow you to fall off the bike easily.
While scooting, lift your feet off the ground and try to balance. But once you notice that you are losing balance, quickly return your feet to the ground.
Afterward, consider scooting again before trying to balance once more.
Step 7 – Start To Ride On Your Own
Now that you are comfortable scooting and balancing, it’s time you move the bike. Here are the tips to observe:
- Place your left foot on the ground and the other on the pedal
- Push the left foot to create some momentum to ride the bike
- While at it, push your right foot down to move
- Now lift your left foot and place it on the other pedal to acquire some balance
- Pedal the bicycle clockwise to speed up and maintain your balance
- If you need to slow down or stop, remember to press the handbrake
Step 8 – Keep Practicing How To Teach Yourself To Ride A Bike
Consider practicing riding the bike until you perfect the skill. Ride as often as you can in a more open space or the parking area.
And once you are confident, you can now ride in your neighborhood or on busier roads.
So, How Long Does It Take To Learn To Ride A Bike?
Different people take different duration to learn to ride a bike. On average, most people take 5-7 sessions (with one session equaling one hour) to scoot and balance on a bike.
That means it could take a couple more sessions to ride around the neighborhood comfortably. But if you employ an instructor, it could take a shorter time.
Important Cycling Lessons on How To Learn To Ride A Bicycle Without An Instructor
These lessons are a must-remember by beginner cyclists:
- Safety comes first – Until you can comfortably ride the bike, don’t forget to wear the helmet. Also, check the handbrakes and tire pressure before cycling to ensure nothing is wrong.
- Have a goal – What are your objectives? Do you want to lose weight, commute, or ride for fun? Remember, your goal is the driving force for conquering your fears and bettering your cycling skill.
- Befriend flatter grounds – Until you can comfortably take on the slopes and climbs, learn to ride on flatter grounds. Even if you fall, the effects won’t be very severe.
Related:
Closing Thoughts On How To Learn To Ride A Bicycle Without An Instructor
Generally, how to learn to ride a bicycle without an instructor is not tricky using my guide. Just follow the steps and practice more often. You may never know; you could be cycling correctly after a few sessions!
Frequently Asked Questions
How can I learn to ride a bike without an instructor?
In my experience, riding a bike without an instructor is definitely possible, it just takes a little practice. Smooth and steady are the order of the day. You’ll need to start by positioning the bike’s front wheel so it’s pointing straight ahead and avoid making any sudden movements. Make sure the ride is kept as smooth as possible, this will assist in developing your balance and easing your fear of falling. With the seat adjusted to a lower level, you’ll be able to touch the ground with your feet, adding an extra layer of security as you learn.
The key is to start by gliding. This involves pushing off the ground with your feet and letting the bike move forward on its own. As you become comfortable with this, you can start to pull your legs in and transition into pedaling. It will make a world of difference when you switch from worrying about your balance to concentrating on your riding. It can be nerve-wracking if you feel like you're being watched, but my advice is to ignore any potential spectators. After all, everyone had to start somewhere!
How long does it take to learn cycling for adults?
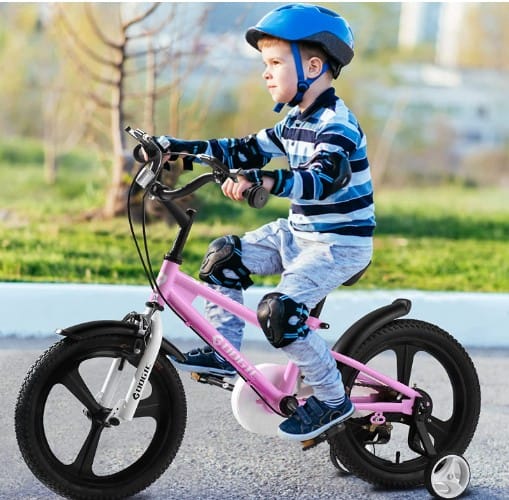
While observing my friends and family members learn to cycle, I’ve noticed something interesting. Kids seem to figure it out quickly, likely due to their fearless nature. On average, they pick up the basics in about an hour or two. But adults, on the other hand, tend to take a bit more time.
The average adult, being more cautious than a child, typically needs around two to three days to get comfortable on a bike. It's important not to let this discourage you though! Remember, learning any new skill takes time. Whether it's playing a new instrument or learning to ride a bike, patience and persistence are sure to pay off.
Is it better to learn how do you ride a bike without training wheels?
From my own personal biking journey and watching others learn, I’d recommend the “gliding” method over training wheels. This method focuses on learning to balance first, then advancing to pedaling. In fact, it’s been my observation that children who start with balance bikes often fare better when making the transition to a traditional two-wheeled bike.
Training wheels can certainly make the initial stages of learning more comfortable, but they do little to help with the most important part: balancing. Gliding intuitively teaches independence and balance, making the switch to pedaling less daunting. Therefore, if possible, I’d suggest going straight for a balance bike or taking off the training wheels and adopting the gliding method.