If you want to prevent expensive repairs to the drivetrain components or bike frame, you must replace the derailleur hanger when it breaks. So, you ought to ask, ‘how do I replace a broken derailleur hanger?’
Start by removing the rear wheel and then loosen the broken derailleur, followed by the hanger. Then detach the hanger before you clean and lubricate where you’ll attach the new hanger. Lastly, fit the new hanger and screw it in place before re-install the rear tire.
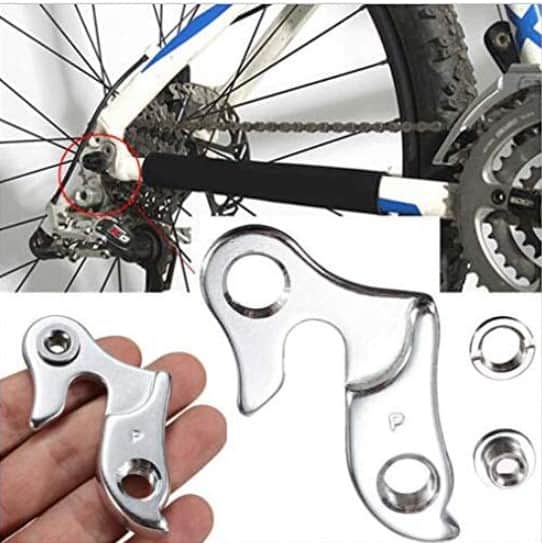
Essentially, the derailleur hanger, also known as the dropout or the mech hanger, deliberately breaks or bends to protect the drivetrain and bike frame during an impact.
For that reason, you have to replace it to protect the drivetrain and bike frame.
I’ll not only offer you a detailed DIY guide to use, but I’ll also help you understand what breaks a derailleur hanger and how you can identify a broken one.
Let’s get started!
How Do I Replace A Broken Derailleur Hanger?
Before I can take you through the basic steps of replacing a broken derailleur, let’s look at what you need for the job.
They include these supplies:
- Hex wrench/Allen wrench (get a 5mm hex wrench which is the standard for hangers)
- Bike grease
- Bike cleaner
- New derailleur hanger (check out the best derailleur hanger here)
Now, here are the steps to change your derailleur hanger:
Step 1 – Rear Wheel Removal
Turn the bike upside down or mount it on a bike stand to remove its rear wheel.
Step 2 – Bolts Loosening
Use a suitable hex wrench to loosen the bolts that hold the old derailleur to its hanger. Ensure you remove the bolts altogether and put them aside.
Step 3 – Hanger Removal (How to Remove Broken Derailleur Hanger)
Also, use the hex wrench to remove the fitting screws that hold the derailleur hanger to the bike frame. That allows you to take out the broken derailleur seamlessly.
Step 4 – Clean Up
Now clean where you’ll place the new derailleur before you can fit it. You can do that with an effective bike cleaner like the MUC-Off MOX-904 Nano Tech Bike Cleaner.
Step 5 – Lubrication
Just cleaning the hanger’s attachment point is not enough. You also have to grease the area, which you can do with the Finish-Line Premium Grease.
The grease not only lubricates but also has rust inhibition properties.
Step 6 – New Hanger Installation
Now that the hanger’s attachment point is clean and well-lubricated, you can fit the replacement hanger. Ensure you fit it correctly and tighten it firmly using the hex wrench.
Step 7 – Rear Wheel Reinstallation
Lastly, re-install your rear wheel as it was and ensure the gears work fine. If they aren’t, readjust them before riding your bike.
What is a Derailleur Hanger For?
A derailleur hanger is the sacrificial component of the bike that absorbs the heavy impact on behalf of the bike frame and drivetrain.
It deliberately breaks or bends to prevent damage to the drivetrain and frame.
Do I Need Derailleur Hanger?
A derailleur hanger (or dropout or mech hanger) is a sacrificial component that protects your bike’s expensive components, mainly the drivetrain and frame.
So, you cannot ignore it when it breaks or bends, as that’ll mean sacrificing your bike’s expensive components.
Cost-wise, it’s cheaper to replace a derailleur hanger than a bike drivetrain.
For example, while it’s possible to get a derailleur hanger for $10-$20, you’ll need about $200 or more to replace a drivetrain component.
So, you generally need a derailleur hanger to protect your drivetrain and frame from costly repairs or replacements. After all, derailleur hanger replacements are DIY.
Overall, it’s advisable always to keep a spare derailleur hanger close by to protect your drivetrain and frame.
What Causes A Rear Derailleur Hanger To Break?
Generally, here are the reasons why most derailleur hangers break:
- Forceful pedaling or over-shifting – If you use a lot of force on the pedals or over-engage the gears, there is always the chance you’ll break the hanger.
- Accidental hit – Since the derailleur hanger is the first part to absorb impact during a heavy collision, it’s always likely to break. That mostly happens when riding aggressively off-road and during a crash.
- Incorrectly-fitted chain – If the chain is wrongly fitted, you’ll have a hard time shifting correctly, and that stresses the drivetrain. Such actions, unfortunately, can break the derailleur as it’s the first to come to the defense of the drivetrain.
- Short or worn out chain – A short or worn out chain doesn’t help either with the shifting. It keeps on slipping off or breaking, and that forces you to put unnecessary force on the drivetrain, and the part taking the hit is the hanger.
- Dirty derailleur – A dirty derailleur also makes shifting hard and stresses the derailleur hanger. And since the hanger is made of delicate materials, it’s likely to break.
- Dirty chain – Like a dirty derailleur, a dirty bike chain makes shifting difficult and puts pressure on the hanger, whose role is to protect the drivetrain.
- Incorrect gear setup – If you use the wrong gear, you are likely to stress the drivetrain. And since the hanger is its first line of defense, it’s likely to give in to the heavy impact.
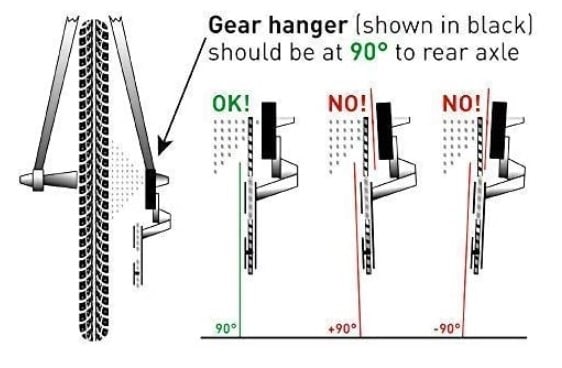
What Does A Broken Derailleur Hanger Look Like?
Most professional cyclists can stand behind the bicycle and identify a broken derailleur.
If you can’t, then you should observe this tip:
- If the chain has formed a vertical line between the cassette and the derailleur pulley, then the derailleur hanger is broken.
- But if the derailleur hanger is only bent, you won’t see s straight line. Instead, you’ll see a line that’s only straight near the cassette but bends inwards towards the bike wheel
Overall, a bent derailleur hanger is straightenable, but a broken one needs replacing.
When Should I Replace A Derailleur?
You should replace your derailleur hanger when it breaks, and that happens when you over-shift, hit something, or do anything else that stresses the drivetrain.
You should also replace the derailleur hanger if it’s excessively bent.
FAQs
1. Can You Replace A Derailleur Hanger?
Nowadays, it’s easier to replace a bike’s derailleur hanger if you get a suitable replacement.
Unlike the old hangers, which were welded onto the bike frame, modern hangers are screwed for easy replacement.
You require an Allen/hex wrench to detach the old hanger and screw the new hanger in place.
2. How Do You Replace A Derailleur Hanger?
You can replace a derailleur hanger by following these simple steps:
- Remove the rear wheel
- Loosen the bolts holding the old derailleur on the hanger
- Loosen the screws on the hanger to remove it (the hanger)
- Clean and lubricate where you’ll fit the new hanger
- Fit the new hanger in place and screw it
- Re-install the rear tire
3. How Much Does A Derailleur Hanger Replacement Cost?
It’s possible to get a decent derailleur hanger for $10-$20. Only a handful cost more than $20.
Derailleur hangers are cheap because they are generally designed to break or bend in place of your drivetrain or bike frame. So, they are usually short-lived.
4. Are Derailleur Hangers Universal?
Currently, SRAM has introduced universal derailleur hangers, and Trek is supporting the idea. AUTUT is another brand selling universal derailleur hangers.
So far, there are only limited universal derailleur hangers. Therefore, you have to be careful not to buy the wrong type.
5. Why Did My Derailleur Hanger Break?
The derailleur hanger mostly breaks as a result of heavy impact on the drivetrain.
Since its role is to protect the drivetrain and frame, it absorbs impact during a crash.
Other possible causes of a broken derailleur include over-shifting, dirty derailleur, or a short, dirty, or worn-out chain.
6. What Happens To The Hanger When Bent?
The hanger breaks apart when bent. Usually, the solid molecules that hold the hanger in place disengage when it bends, producing heat that damages the hanger.
7. Can You Straighten A Derailleur Hanger?
Provided that the derailleur hanger is only slightly bent, you can comfortably straighten it. Just ensure you don’t over-bend it when trying to straighten it.
But if the bend is excessive, replace the derailleur hanger instead. A new hanger will cost you $10-$20.
8. Is It Hard To Replace A Derailleur Hanger?
You probably don’t know this but replacing a derailleur is not as complicated as most people think.
You need to unscrew and remove the old derailleur, clean and lubricate its attachment point, and then fit and screw the replacement hanger in place.
Also Read:
- A Guide to Installing A Rear Derailleur on a Mountain Bike
- A Guide to Installing A Front Derailleur on a Mountain Bike
Closing Thought on ‘How to Replace a Broken a Broken Deralleur Hanger’
Are you still wondering, ‘how do I replace a broken derailleur hanger?’ I guess not, especially after going through my DIY guide!
So, use the tips each time you want to replace your derailleur hanger. And since it’s prone to breakage, you’ll have to replace it more often than you think.
Frequently Asked Questions
How do you replace a derailleur hanger?
Replacing a derailleur hanger is actually a quite straightforward process if you have the right tools and a little bit of patience. First, you’ll want to separate the derailleur from the hanger with a 5mm Allen wrench, taking care not to lose the small bolt that holds them together. After you have detached the derailleur, you can then remove the old hanger; usually, this involves unscrewing a couple of 3mm or 2.5mm Allen bolts. Next, align the new hanger with the bolt holes on the bicycle frame and secure it in place. Re-attach the derailleur to the hanger and adjust if necessary to ensure that it shifts smoothly. This task takes me about 15-20 minutes, depending upon the bike model. I’ve repeated this process more than I can count, and every time I remind myself to be gentle, especially with the screw threads. The better care you take of them, the easier your maintenance tasks will be in the future.
Can you fix a derailleur hanger?
Depending on the severity of the derailleur hanger’s deformation, it may be feasible to straighten it rather than replace it outright. If the hanger is just slightly bent, a hanger alignment tool can be used to correct its position massaging it back into place. I recall one time when I was out on a trail and I nudged my bike against a rock subtly enough that it didn’t seem like a big deal at the time. It was only when I got back on and started experiencing inconsistent gear changes that I realized the impact had bent my hanger. Fortunately for me, I had brought my tools along and was able to quickly straighten the hanger enough to get me home. However, if a hanger is severely bent or broken, it becomes necessary to replace it. I emphasize, safety should be the foremost concern and riding with a severely damaged hanger can lead to dangerous situations.
Why do derailleur hangers break?
Derailleur hangers have a propensity to break or bend primarily because that’s what they’re designed to do. They serve to be the weakest link in the system acting as a buffer between the more vital parts of your bike like the frame or derailleur and any potential damage. This role of self-sacrifice was plainly demonstrated in a nasty incident I experienced a few years ago. I took a particularly tough tumble while biking downhill at speed—I’m talking body over handlebars, the whole deal. Miraculously, the bike made it out with the derailleur hanger being the only casualty. It had bent, absorbing the shock of the fall, thereby effectively protecting the bike frame and derailleur. Could you imagine my horror if the frame, rather than the hanger, had taken that hit? That’s why we owe a lot to these little metal pieces.
Are derailleur hangers universal?
While it would be incredibly convenient if all derailleur hangers were universal, the reality is they’re not. Back in the day, each frame had its own specific hanger design, and although in recent years we’ve seen a move towards more standardization, this still rings true for the vast majority of bikes. My garage is a testament to this fact. I have a separate box with different hangers for each of my bikes: one for my single-speed city bike, another for my weekend road bike, and yet another for the mountain bike I save for special occasions. Each of these hangers has a different design to fit their specific frames. But don’t despair. Most bike shops and online retailers will categorize hangers according to the frame/bike brand and model, which should make it easier to find the exact part you’re looking for.